
Email Security Made Simple
Signet7 adds a digital signature to your important emails so recipients can verify they're authentic and haven't been tampered with. Think of it as a "wax seal" for digital messages.
Choose Your Path
Select what you want to do with Signet7. No technical knowledge required - we'll guide you through each step.
Check an Email
Check if an email is authentic and hasn't been changed. No account or installation required.
Save the email file
If the email has a Signet7-sealed.eml attachment: Open and save that attachment file.
If there's no attachment: Save the entire email from your mail app (File → Save As).
Drop and verify
Drag the saved file onto the verification page. Results appear instantly - no waiting or processing time.
Understanding your results:
Sender verification: Listed, Not listed, or Listing doesn't match this address - these results help you understand sender authenticity.
Verification status: Matched, unmatched, or unknown.
Important: Signet7 tells you if an email has been tampered with, but doesn't tell you if the content is safe, authorized, or trustworthy. Always use your judgment when acting on email content.
Send Secure Emails
Choose the setup method that works best for your email client. All options work with your existing email account.
Outlook on the Web
Best for Microsoft 365 users. Add digital signatures directly in your web browser.
Desktop Email Apps
For Outlook Desktop, Apple Mail, or Thunderbird. Automatically signs all your outgoing emails.
What you'll need for either option:
- 📧 A business or work email address
- ⏱️ 10-20 minutes of setup time
- 🆓 Free Signet7 account (we'll help you create one)
Setup: Outlook on the Web
Add digital signing to Outlook on the web. Perfect for Microsoft 365 users who want browser-based email security.
Step 1: Create your Signet7 account
- Go to account.signet7.io/account
- Enter your work email address
- Click "Email a sign-in link"
- Check your email and click the link (or enter the 6-digit code)
- Copy your sender token from the one-time email Signet7 sends after sign-in (the company account page does not show the raw token)
Step 2: Install the Signet7 Outlook pane
- Download the manifest file: signet7.io/outlook/manifest.xml
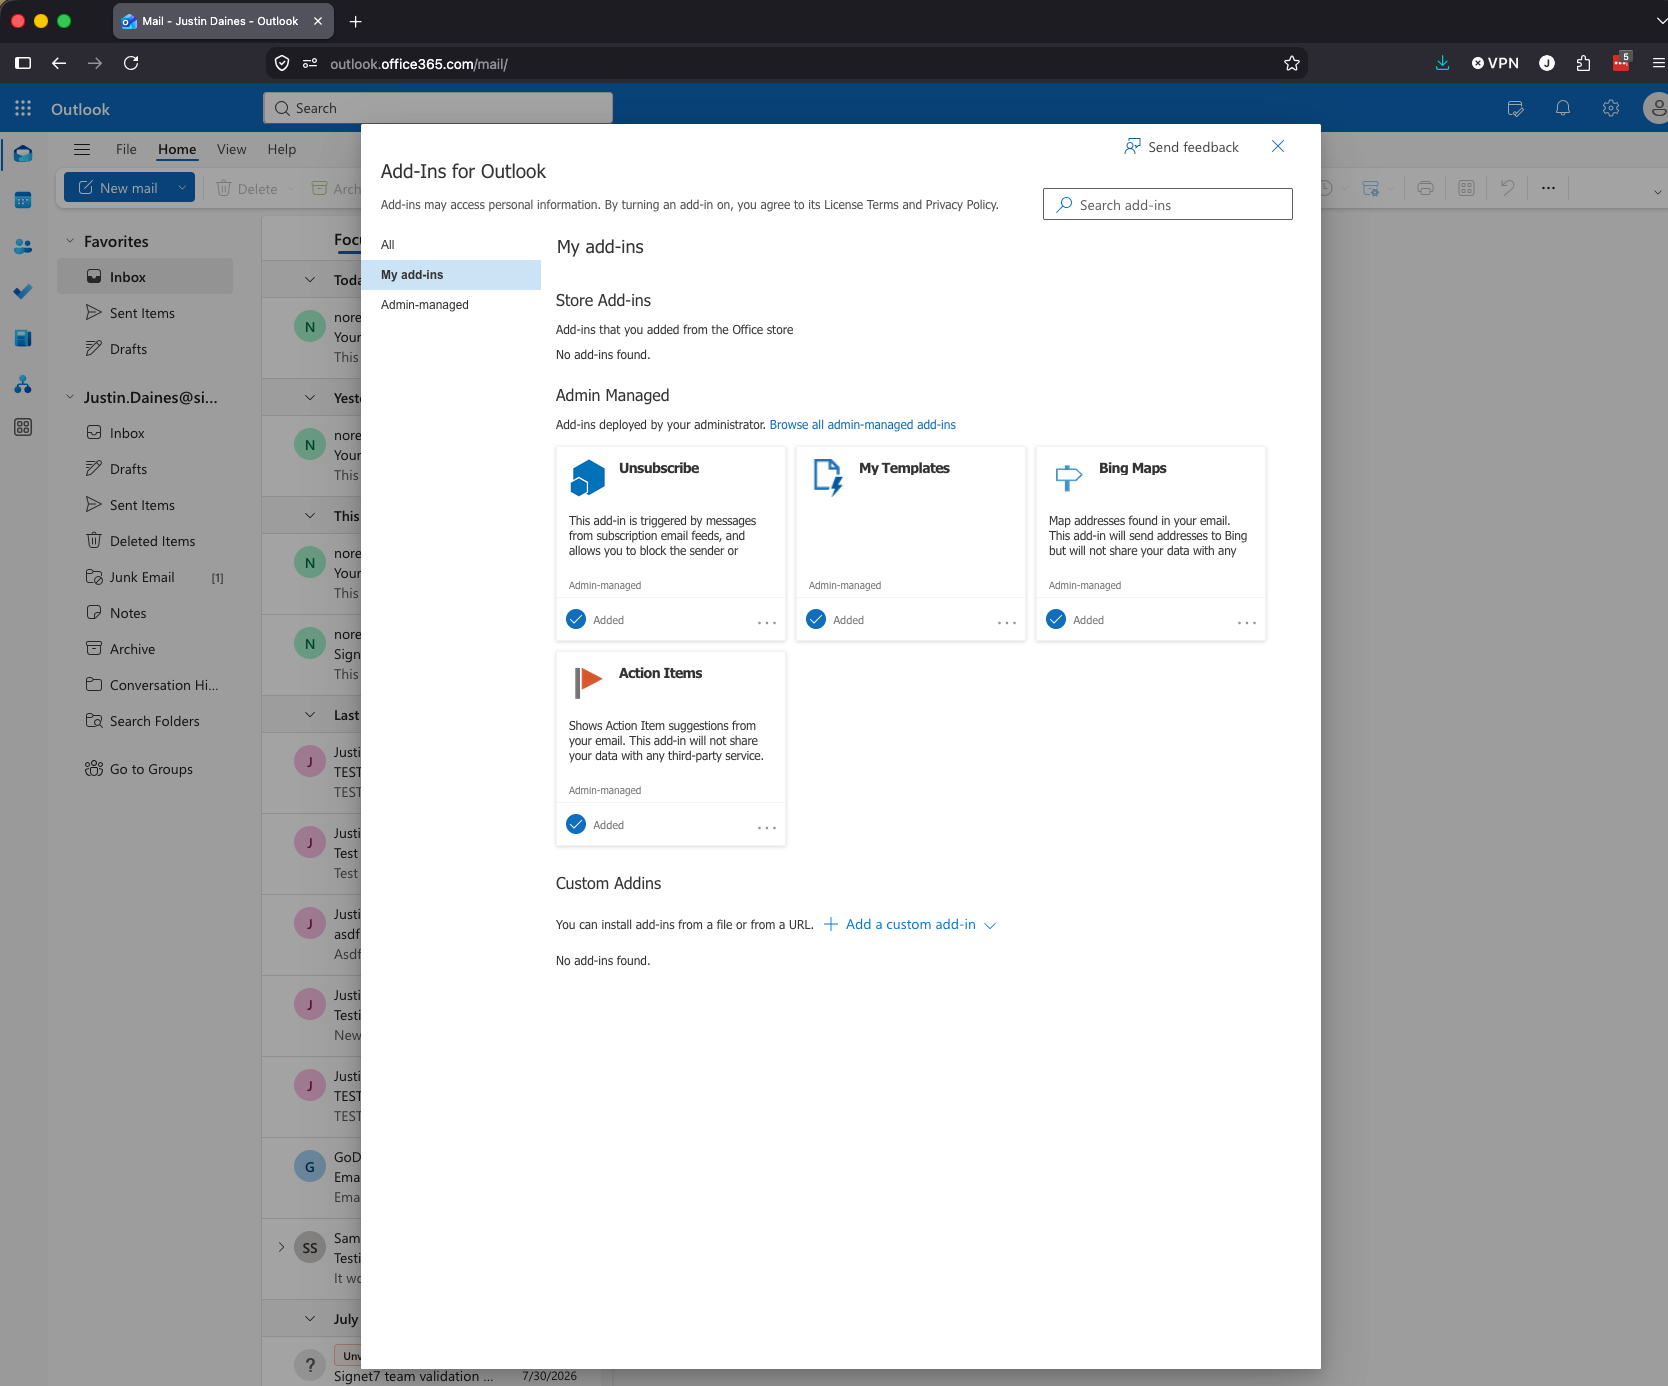
- In the same browser as Outlook, go to aka.ms/olksideload
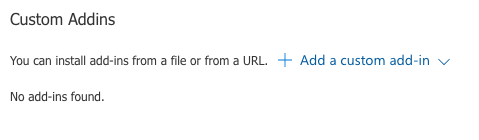
- Click My add-ins → Custom Addins → Add a custom add-in → Add from File
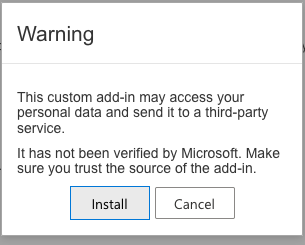
- Select the downloaded
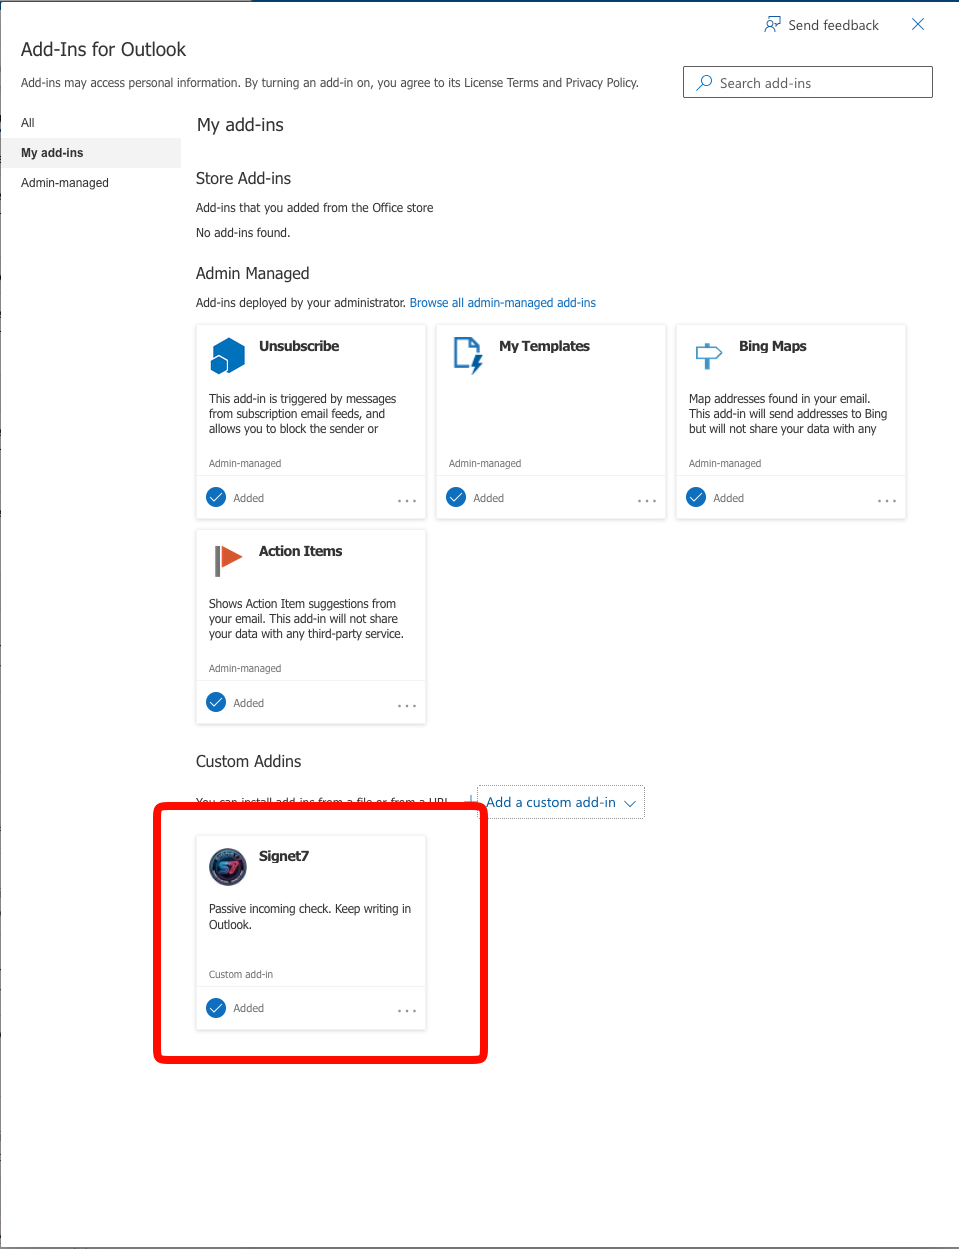
manifest.xmlfile and click Install - Reload Outlook on the web, then see Step 3 to sign an email
Step 3: Use Signet7 to sign emails
- Compose a new email in Outlook on the web
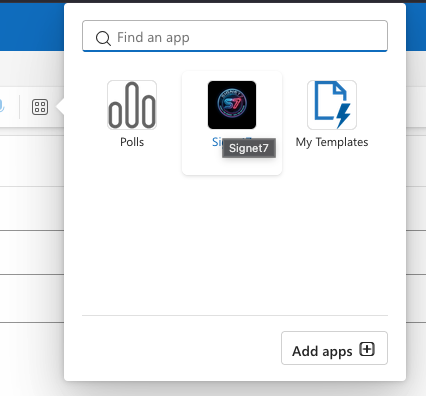
- Click Enhance Outlook with apps in the compose toolbar
- Select Signet7 from the apps list
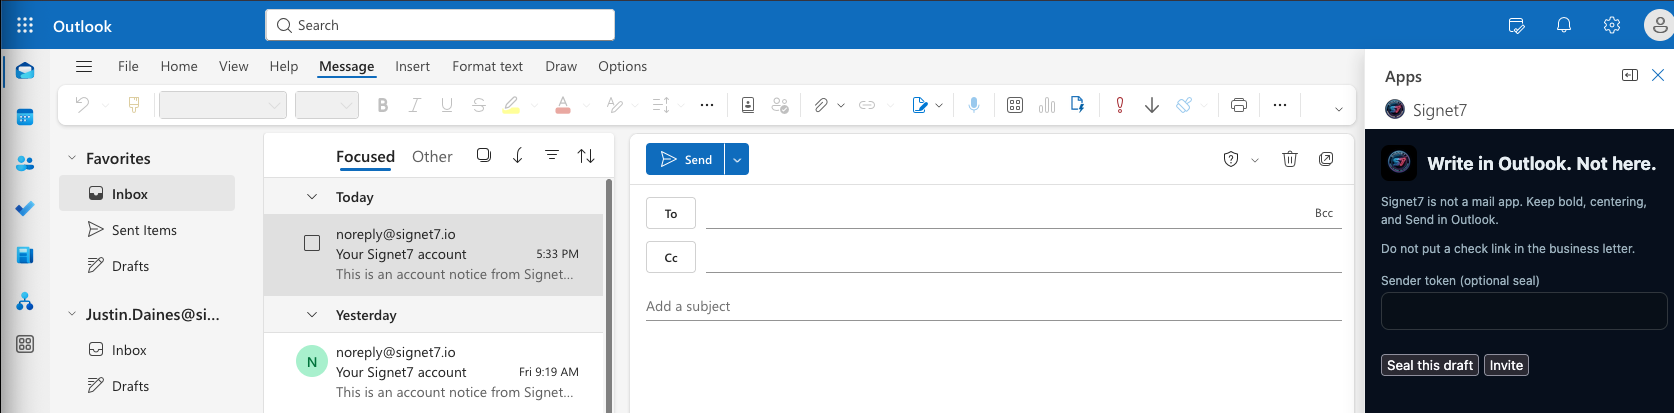
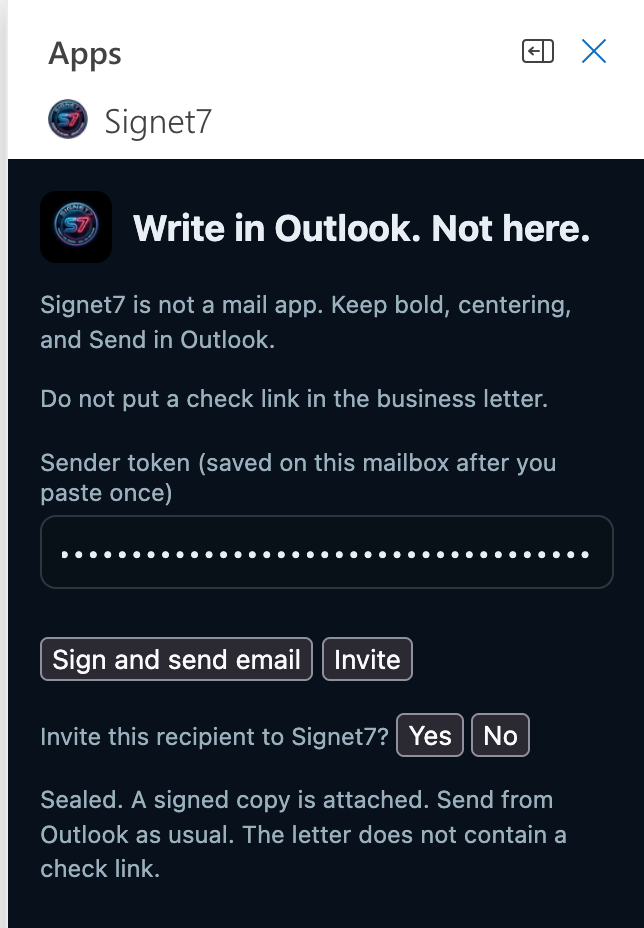
- Paste your Signet7 token in the pane (this saves for future use)
- Click Seal this draft
- The attached file is the letter. Do not send the Outlook draft.

✅ You'll know it's working when:
- You see "Sealed. A signed copy is attached" in the Signet7 pane
- Your sent email includes a "Signet7-sealed.eml" attachment
- Recipients can verify your emails at verify.signet7.io
Setup: Desktop Email Apps
Automatically sign all your outgoing emails from Outlook Desktop, Apple Mail, or Thunderbird.
Step 1: Create your account and get credentials
- Create your Signet7 account at account.signet7.io/account
- Copy your sender token from the one-time email Signet7 sends after sign-in (not from the company account page)
- Name that work email in the Signet7 app. The mailbox password stays in the app. This website never asks for it.
- For Microsoft 365 users: Your IT team may need to set up Microsoft Entra integration
Step 2: Download and install Signet7 desktop
- Go to the Download page and get the desktop app
- On a Mac, if Gatekeeper blocks the first launch, follow Opening Signet7 on a Mac (first time) before you continue
- Extract the zip file and run the Signet7 application
- Configure your email settings in the left panel
- Paste the sender token into the Signet7 app. Name the work email there. The mailbox password stays in the app.
- Click Save this company inbox
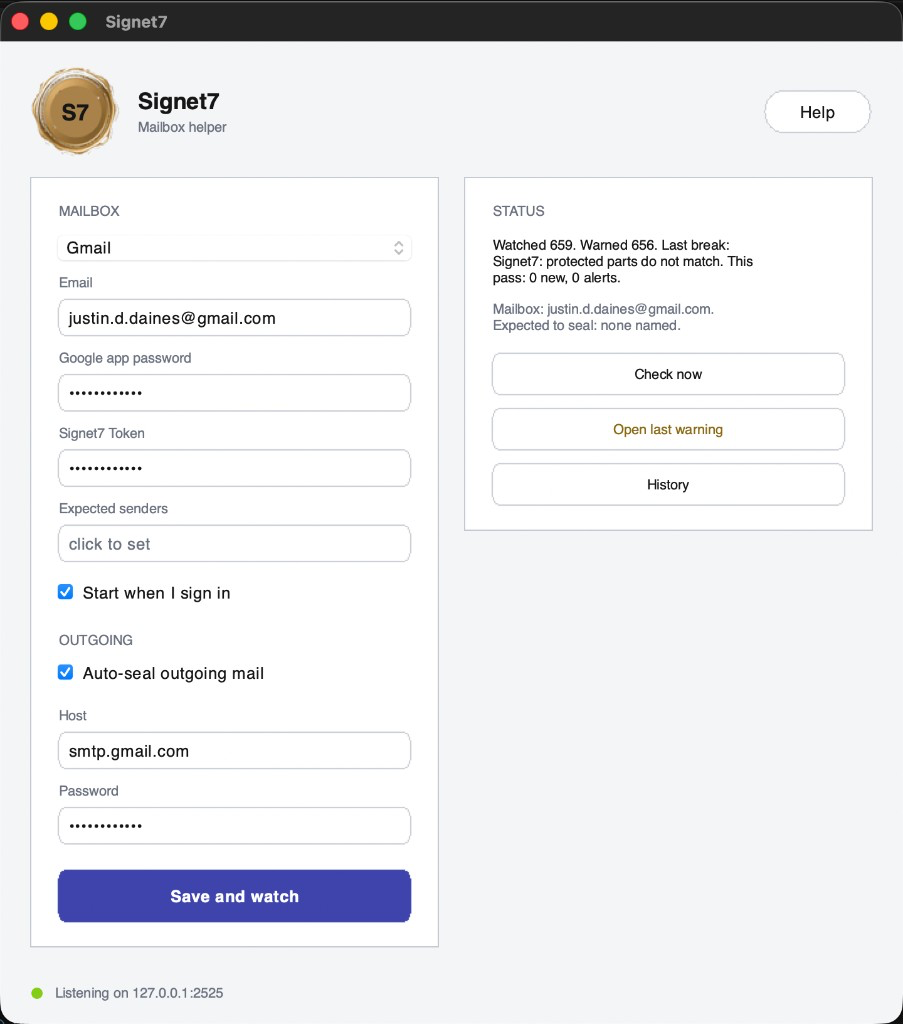
- Verify the footer shows Listening on 127.0.0.1:2525 (see Apple Mail for a screenshot)
Step 3: Configure your email client
For Outlook Desktop:
- Go to File → Account Settings → More Settings → Outgoing Server
- Set SMTP host to
127.0.0.1, port2525 - Turn TLS/SSL off for this connection
- Send a test email
For Apple Mail:
Full steps with screenshots: Seal from Apple Mail.
For Thunderbird:
- Go to Account Settings → Outgoing Server → Add
- Set host to
127.0.0.1:2525with TLS off - Use this server for your work email account
- Send a test email
✅ You'll know it's working when:
- Signet7 desktop shows "Listening on 127.0.0.1:2525"
- Test emails are automatically signed (no attachment, email itself is signed)
- Recipients can verify your emails by saving and dropping them on the verification tool
Seal from Apple Mail
Use this after your company account is ready and Signet7 desktop is installed. Name the work email in the app. The mailbox password stays there. This website never asks for it. Save the company inbox in Signet7 desktop first — the footer must read Listening on 127.0.0.1:2525 before Mail can seal through it. Do not point outgoing SMTP at 127.0.0.1 on a Google-type account (Internet Accounts → Google); Mail lists that server as Offline and will not send.
Step 1: Add an Other Mail Account
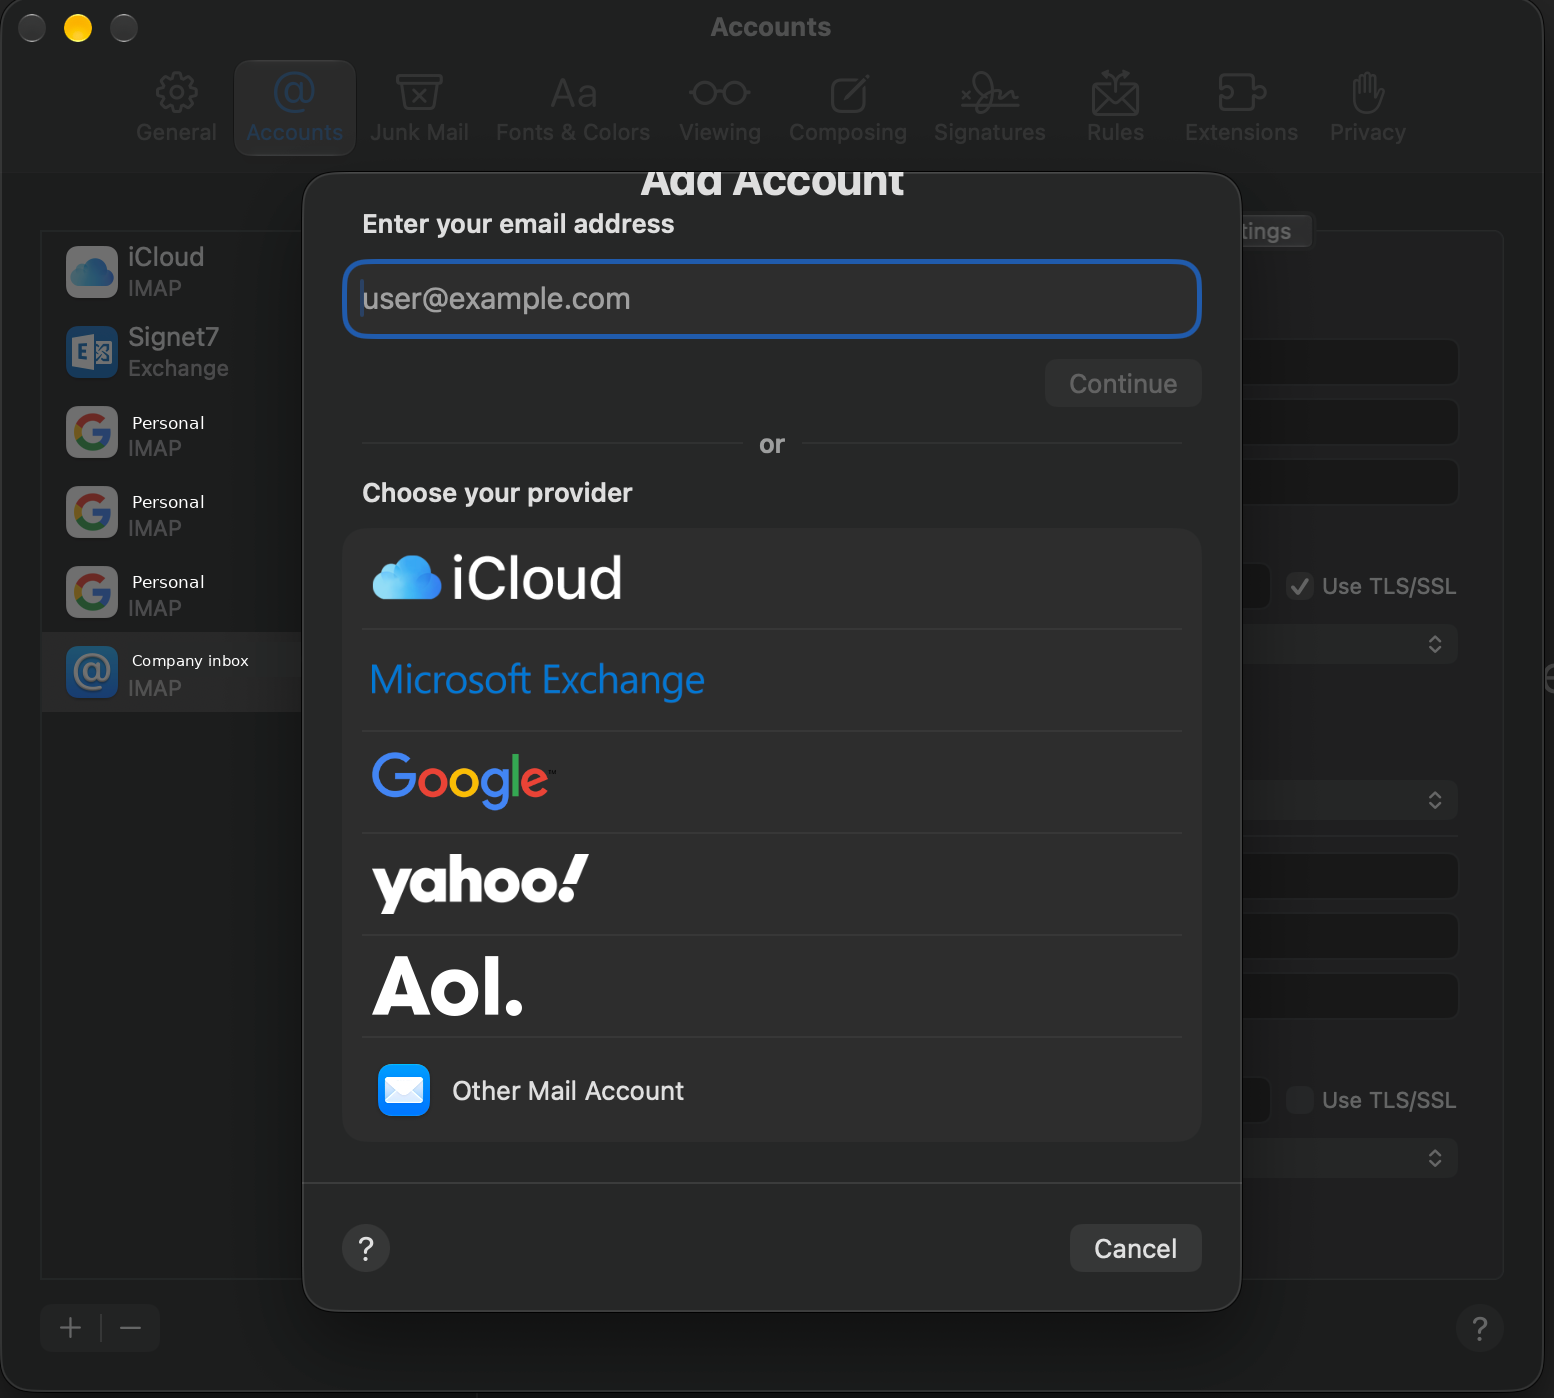
- Mail → Settings → Accounts → +.
- Choose Other Mail Account (not Google, iCloud, or Exchange shortcuts).
- Enter the company inbox email. The mailbox password stays in the Signet7 app, not on this page.
Step 2: Set Server Settings for Signet7 routing
- Open the new account → Server Settings. Uncheck Automatically manage connection settings on incoming and outgoing if Mail checked it.
- Incoming mail: leave it with the mail program you already use. Do not type a mail-server host on this page.
- Outgoing Mail Server (SMTP): Host Name
127.0.0.1, Port 2525, Use TLS/SSL off, Authentication None. User Name can stay your full email address; password is not used on this hop. - Save. Compose with From: this Other account (not the Google-type account). You can keep the Google account for reading only.
- Send a test. Recipients check at verify.signet7.io/email/verify; they are not required to install Signet7.
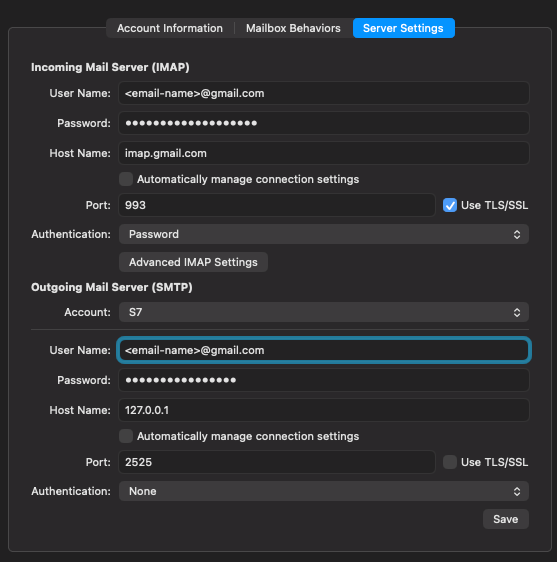
127.0.0.1 port 2525, TLS off, Authentication None.Mail may show “Unable to verify account name or password” while saving outgoing 127.0.0.1. If incoming IMAP is correct, dismiss it and send a test. Connection Doctor lists Gmail IMAP first — search the log for 127.0.0.1 or 2525.
Step 3: Confirm Signet7 desktop is listening
In Signet7 desktop, open Company Inbox, fill the company inbox fields, and click Save this company inbox. The sidebar footer must show Listening on 127.0.0.1:2525 before you send from Mail.
Create Your Signet7 Account
Set up your free account to start signing emails. No credit card required.
Enter work email
Use your business or work email address. Consumer personal addresses (personal Gmail, Yahoo, Hotmail, and similar) are not valid for company account signup or signing. Google Workspace and other work mailboxes your org uses as the company inbox are fine—see Desktop email apps and Apple Mail when that inbox is Google-hosted.
Verify and get token
Click the link in your email or enter the 6-digit code. Signet7 emails your first sender token once—copy it from that message for setup. The company account page shows labels and status only, not the raw token.
Important: Keep your sender token secure. It signs your outgoing mail. A token stays valid until the account owner deactivates it (see Manage sender tokens). If you lose it, the owner creates a new sender token in the company account and copies the raw value from the one-time email—Signet7 never shows that value on the page again.
Manage sender tokens
Sender tokens are the secrets that sign your outgoing mail. Each Signet7 account can hold multiple tokens so different people or devices can seal without sharing one password-like string.
Account owner only: Only the account owner can create sender tokens, mark a token for deactivation, or permanently delete a deactivated token. Other users on the account can still paste an active token into the Signet7 Outlook pane or desktop app if the owner shared it with them through your normal internal process.
How many tokens you can have
By default up to five sender tokens are allowed per account. If you need more, email support@signet7.io and Signet7 can raise the limit for your account.
Create a sender token
Open the company account
Sign in at account.signet7.io/account as the account owner. Open Account overview (or the Tokens area on that page).
Create and label
Choose to create a new sender token. Add an optional label (for example Outlook laptop — Alex). If you skip a label, the company account shows a short fingerprint so you can tell tokens apart later.
Save the token from email
Signet7 emails the raw token once to the owner. Copy it from that message and store it somewhere safe. The company account never displays the full token again.
Use the token in Outlook or desktop
- Outlook on the web: Open the Signet7 Outlook pane while you compose mail and paste the token into the token field. The pane saves it for later messages on that browser.
- Desktop Signet7: Paste the same token into the Signet7 Token field in the desktop app on each computer that should seal with that token.
Every active token can seal mail until you mark it for deactivation. You can run more than one active token at the same time (for example one per device or team member).
Mark a token for deactivation
When a token should stop signing, the owner marks it for deactivation in the company account. Sealing with that token stops immediately—there is no grace period where old copies still work.
Before you mark a token: Update every Outlook pane and desktop install that still uses that token. Point them at another active token, or create a new one first. Any device still holding the old token will no longer seal until you paste a different active token.
Permanently delete a token
After a token is marked for deactivation, the owner must wait seven days. Then the company account lets the owner permanently delete that token record. Deletion is final; you cannot recover the token value or reuse the same secret.
Audit
Signet7 records when sender tokens are created, marked for deactivation, and deleted. That history supports security review on your side. It is not a separate product you configure in these docs—your account activity reflects those events.
Need a higher token limit? Contact support@signet7.io from the account owner address.
Enterprise Deployment
Deploy Signet7 across your organization with centralized management and Microsoft Entra integration.
🏢 IT Administrator Setup
Deploy the Outlook pane to multiple users through Microsoft 365 admin center.
- Microsoft 365 Integrated Apps deployment
- Group-based rollout options
- No individual user setup required
🔐 Microsoft Entra Integration
Enterprise-grade authentication and permissions through your existing Entra setup.
- Single sign-on integration
- Delegated permissions model
- Automated mailbox monitoring
Planning your deployment? Contact our team at support@signet7.io for assistance with large-scale rollouts and custom configurations.
Microsoft Entra Setup
For detailed Microsoft Entra integration instructions, contact our support team.
Deployment Options
Choose from manual rollouts, group-based deployments, or organization-wide installations.
How It Works
Understanding the technology behind Signet7's email security.
🔏 Digital Signatures
Signet7 creates a cryptographic signature for each email that proves authenticity and detects tampering.
🔗 Sender Verification
Recipients can verify that emails actually came from the claimed sender and haven't been modified.
🛡️ Tamper Detection
Any changes to the email content, subject, or attachments after signing will be detected during verification.
Two signing methods:
Outlook Pane Method
- Creates a
Signet7-sealed.emlattachment - Original email remains unsigned
- Recipients verify the attachment file
- Works in web browsers
Desktop App Method
- Signs the entire email message
- No separate attachment needed
- Recipients verify the email itself
- Requires local software
Troubleshooting
Common issues and solutions for Signet7 setup and usage.
❌ Outlook pane not appearing
- Check if manifest.xml was uploaded correctly
- Try refreshing Outlook on the web
- Verify your mailbox supports custom add-ins
- Use aka.ms/olksideload for sideloading
⚠️ Emails not being signed
- Confirm you clicked Seal this draft. The attached file is the letter. Do not send the Outlook draft.
- Check that your Signet7 token is valid
- For desktop: verify "Listening on 127.0.0.1:2525" appears
- Make sure SMTP is configured correctly
🔍 Verification failing
- For pane method: verify the Signet7-sealed.eml attachment
- For desktop method: save and verify the entire email
- Check that the email hasn't been forwarded or modified
- Ensure you're using the correct file type
🍎 Mac says Signet7 Not Opened
- Signet7 for Mac is unsigned during early access — macOS is expected to block the first launch
- Use System Settings → Privacy & Security → Open Anyway after you try once (Sequoia and later)
- See the full walkthrough: Opening Signet7 on a Mac (first time)
🔐 Token or account issues
- If you lost the token, the account owner must create a new sender token in the company account and copy the raw value from the one-time email (see Manage sender tokens)
- Verify your work email address is correct
- Confirm the token was not marked for deactivation—deactivated tokens stop sealing immediately
- Contact support@signet7.io for account-related issues
Still need help? Contact our support team at support@signet7.io or check our FAQ page for more solutions.
Agents & API integration
Who this is for: builders connecting Signet7 to agents, workflows, or APIs — not end users sealing or checking mail in Outlook.
What it’s for: before your system acts on an email (especially money moves), call Signet7’s API, get allow or refuse, and honor that answer.
Public product shape lives on Product. Trust language is on Trust. Privacy, security, and retention are on Trust center.
Signatures cover both authenticity and the action the email is asking for (for example pay or transfer). If Signet7 doesn’t recognize that action, it says do not proceed. There is no separate inbound/outbound direction field.
Your systems call Signet7’s API over HTTP or MCP. Signet7 returns allow or refuse; your system must follow that. Treating the answer as a hint and executing anyway defeats the point.
To check an email, submit the original message bytes (text and HTML parts, attachments, and headers) as email candidate s7-email-1 — don’t rebuild From, To, Subject, or body.
EXECUTEWIRE, PAY, PURCHASE, REFUND, TRANSFERShort sheets: IT · outbound seal · recipient check.
HTTP APIs
Machine-facing routes for agents and workflows. The live OpenAPI contract is version 0.2.0rc1; this page lists the builder-facing subset only.
Base URL
The planned integrator host is https://api.signet7.io (customer API door shipping in signet7-core; DNS and environment cutover may still be pending). That host is not live yet — call the same customer API routes on https://verify.signet7.io until cutover.
OpenAPI document: https://verify.signet7.io/openapi.json. After the api host is live, the same document will be served on https://api.signet7.io/openapi.json as well.
Auth
Send HTTP Bearer credentials on each request: Authorization: Bearer … with a company-account machine credential (opaque API token). Issue and rotate tokens through your company account and its control-plane keys — the same model OpenAPI describes when authentication is configured. Browser session cookies from account sign-in are for humans, not for agents calling Signet7’s API.
Primary endpoints for agents
POST /api/v1/email/verifyVerify an s7-email-1 .eml (component-level email integrity). Independent of ledger verify.POST /api/v1/decisionsEvaluate policy and seal a decision — the allow/refuse path when your workflow acts on email after calling Signet7’s API.OpenAPI includes additional routes (send, sign, account session, and others). Public Docs do not catalog admin, billing, legal-hold, retention governance, or staff /api/v1/admin* paths.
Ledger verify is not email verify: GET /api/v1/verify returns a ledger integrity report (optional WORM anchor). It does not check an .eml. For message integrity use POST /api/v1/email/verify. People checking mail in a browser use the human check page at verify.signet7.io/email/verify — not these API routes alone.
MCP
Today, MCP is a stdio FastMCP server that calls the HTTPS API. Set SIGNET7_MCP_BASE_URL to https://verify.signet7.io for now; after api-door cutover, point it at https://api.signet7.io. There is no separate mcp.signet7.io HTTP or SSE MCP endpoint yet — reuse the API host.
Helper instruction card
Do not train a model on company mail. Do not rebuild From, To, Subject, or body. Save the original message file. Submit those bytes to the check page. Read two facts: seal, and listing. If the check is down, do not act. Recipients are not required to install. Company computers use the desktop zip, not pip. This card is instructions, not a plugin.
Current Status and Limitations
Early access status: App signing is not finished yet — not Authenticode. The desktop helper cryptographically seals that exact message, and this is not Authenticode signing. Domain-wide is a choice, covering specific addresses assigned to it rather than every possible mailbox automatically.
For company verification, use our Look up a company tool. Listing lookup is available for registered organizations.
Miscellaneous
- Largest email: Signet7 desktop can seal an email up to 3.75 MB. A larger email is refused.